
TL;DR:
- Consistent, empirical validation reduces late-stage rework and costly redesigns.
- Edge case mapping and risk analysis are essential before testing to ensure real-world robustness.
- Repeating validation cycles and documenting failures inform continuous improvement and reliable design decisions.
Inconsistent design validation is one of the most preventable sources of project rework in both UX and industrial design. When teams skip structured workflows, critical issues surface late, stakeholder expectations diverge, and costly redesigns follow. A single missed edge case in a mobile context or an undefined acceptance criterion can cascade into weeks of corrective iteration. The evidence is clear: teams that apply empirically grounded validation frameworks catch more issues earlier, reduce post-launch defects, and produce more defensible design decisions. This guide synthesizes peer-reviewed research and validated methodologies into a structured, actionable workflow you can apply immediately.
Table of Contents
- Understanding design validation: purpose, pitfalls, and prerequisites
- Mapping risks and edge cases before validation
- Step-by-step design validation workflow
- Verification, iteration, and documenting results
- What most teams overlook in design validation workflows
- Advance your workflow with evidence-backed research
- Frequently asked questions
Key Takeaways
| Point | Details |
|---|---|
| Map risks first | Identify edge cases and high-impact risks before starting validation workflows. |
| Use empirical benchmarks | Rely on validated metrics like SUS, NASA-TLX, and PAI to set and track validation standards. |
| Follow a repeatable process | Break validation into clear steps and document outcomes for continual improvement. |
| Iterate based on data | Benchmark, review, and adjust designs repeatedly to achieve optimal results. |
Understanding design validation: purpose, pitfalls, and prerequisites
Design validation and design verification are related but distinct processes. Verification asks whether the design was built correctly according to specifications. Validation asks whether the correct design was built for the actual user and context. Conflating the two is a foundational error that leads teams to ship technically compliant products that fail in real-world use.
Validation fails for predictable reasons:
- Edge cases are underestimated: Designers test the happy path and miss low-frequency but high-impact scenarios.
- Context is stripped away: Lab conditions rarely replicate the noise, interruptions, and constraints of real use environments.
- Stakeholder misalignment: Acceptance criteria are vague or unconfirmed, so validation results are interpreted differently by different teams.
- Shifting baselines: Without pre-established benchmarks, teams cannot determine whether iteration has actually improved the design.
Before any validation activity begins, three prerequisites must be in place: a stakeholder map that identifies who owns each requirement, a documented set of acceptance criteria tied to measurable outcomes, and a risk assessment framework such as Failure Mode and Effects Analysis (FMEA) or a structured risk map.
Empirical measurement tools are equally essential. Validated instruments such as SUS (System Usability Scale), NASA-TLX (Task Load Index), UMUX-Lite, and PAI (Product Aesthetics Index) set baseline standards and are validated across thousands of cases, providing objective, citation-ready evidence for design decisions.
| Tool | What it measures | Validated use case |
|---|---|---|
| SUS | Perceived usability | Digital interfaces, enterprise tools |
| NASA-TLX | Cognitive load | Complex task environments |
| UMUX-Lite | Usability satisfaction | Quick benchmarking cycles |
| PAI | Aesthetic perception | Physical and digital product design |
Explore design validation workflows and track design intelligence updates to stay current on emerging benchmarking standards.
Pro Tip: Establish your benchmark scores before the first validation session. Without a baseline, you cannot determine whether design changes represent genuine improvement or random variation.
Mapping risks and edge cases before validation
With the essentials mapped out, prioritize uncovering the risks and edge cases that can derail even the best-laid designs. Edge cases are not rare anomalies; they represent the full boundary of realistic use conditions. Edge cases in design validation include behavior gaps (unnoticed controls), context gaps (mobile and low-light environments), error and interruption scenarios, accessibility failures, and input extremes. Each category requires deliberate attention before testing begins.
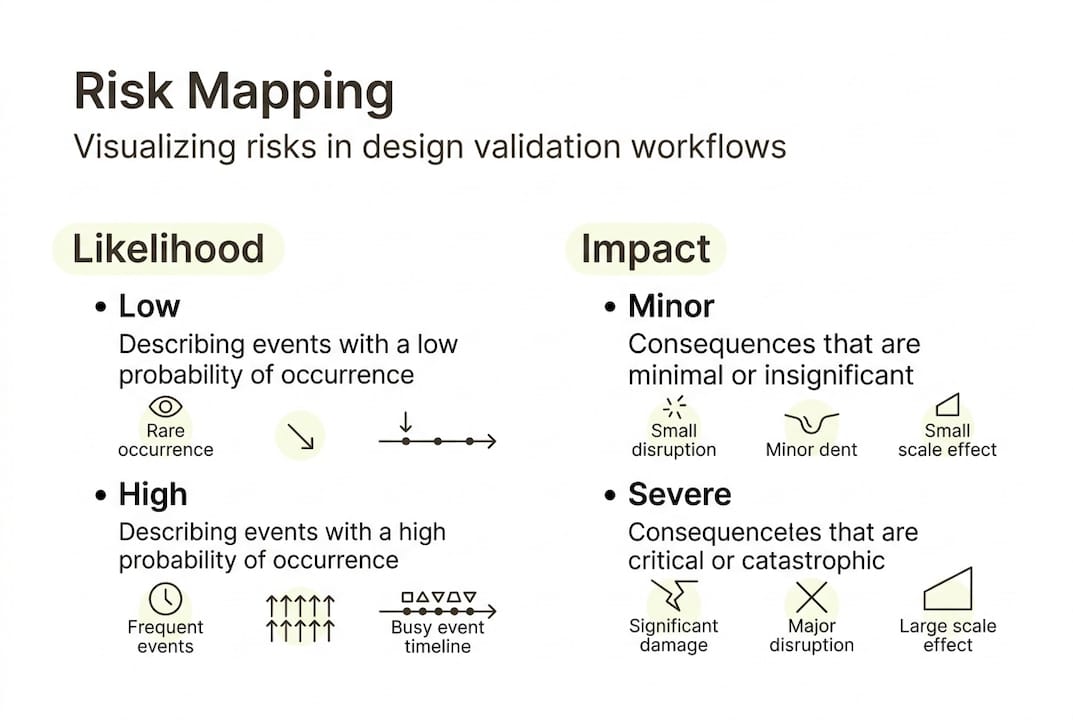
A risk map plots identified risks on a two-axis grid of likelihood and impact. High-likelihood, high-impact risks receive immediate attention; low-likelihood, low-impact risks are documented but deprioritized. Pairing the risk map with structured "What if" exercises surfaces scenarios that standard test scripts miss entirely.
| Method | Best for | When to use |
|---|---|---|
| FMEA | Systematic failure analysis | Early-stage and pre-launch validation |
| Risk map | Visual prioritization | Cross-functional stakeholder sessions |
| Inclusive design review | Accessibility and edge-user needs | Throughout the design cycle |
Conduct an edge case sweep using this sequence:
- List all user types, including low-frequency and accessibility-dependent users.
- Identify all environmental contexts: lighting, connectivity, device type, and noise level.
- Document all error states and recovery paths.
- Apply FMEA to each failure mode: severity, occurrence, and detectability ratings.
- Rank findings by risk priority number (RPN) and assign ownership.
Practical resources for mapping design risks and harmonizing risk assessments across teams provide structured models for this phase.
Critical note: Mobile context is consistently underestimated in validation planning. Reduced screen real estate, variable connectivity, and one-handed operation create failure modes that desktop-focused test scripts never expose. Build mobile-specific scenarios into every risk map.
Pro Tip: Tackle the highest-impact risks first, not the easiest ones. Teams that sequence by convenience rather than severity consistently find critical failures only after launch.
Step-by-step design validation workflow
With risks accounted for, move into the core workflow, a proven sequence that aligns both user experience and industrial validation needs. A 12-step usability testing framework covering goal definition, user recruitment, test type selection, and empirical benchmarking reliably matches project needs across diverse design contexts.
- Define validation goals: Align with acceptance criteria and stakeholder requirements.
- Recruit representative users: Include edge-case user profiles identified in the risk sweep.
- Select test modality: Moderated testing for complex tasks; unmoderated for high-volume behavioral data.
- Choose empirical instruments: Assign SUS, NASA-TLX, or PAI based on what is being measured.
- Set success metrics: Task success rate, time-on-task, error rate, and satisfaction scores.
- Pilot the protocol: Run a small-group pilot to identify script ambiguities before full sessions.
- Execute sessions: Follow the script; document deviations and unexpected behaviors.
- Score instruments: Calculate SUS, NASA-TLX, or PAI scores immediately after each session.
- Identify severity ratings: Classify each issue by frequency and impact.
- Synthesize findings: Group issues thematically; map back to risk categories.
- Compare against benchmarks: Determine whether scores meet pre-established thresholds.
- Generate a prioritized issue list: Rank by severity and assign to design owners.
| Workflow stage | Evidence-based tool | Output |
|---|---|---|
| Goal definition | Acceptance criteria matrix | Measurable validation targets |
| User testing | SUS, NASA-TLX, PAI | Scored usability and aesthetic data |
| Issue classification | Severity rating scale | Prioritized defect list |
| Benchmark comparison | Longitudinal score tracking | Pass/fail against baseline |
The PAI instrument, validated across 7,000+ test cases, provides a reliable aesthetic benchmark that complements functional usability scores, particularly for physical product validation.
Research on usability testing methods, participatory design, and wearable UX validation each offer domain-specific workflow adaptations worth integrating.
Pro Tip: Always pilot test the validation protocol with two or three internal participants before recruiting external users. Script gaps and ambiguous task instructions surface quickly in pilots and are far cheaper to fix than mid-study redesigns.
Verification, iteration, and documenting results
Carrying out the validation workflow is just the beginning. Ensuring actionable improvement comes from what follows: systematic verification, structured iteration, and disciplined documentation.

Verification at this stage means checking validation outputs against the original acceptance criteria and benchmark thresholds. A design that scores below the SUS benchmark of 68 (the industry average) requires targeted iteration before it advances. Benchmarking repeatedly for longitudinal data, and documenting task success rates, severity ratings, and PAI or UX metrics, creates the evidentiary foundation for iterative improvement cycles.
Iteration is not guesswork. Each identified failure mode should trace back to a specific risk category in the FMEA, enabling targeted redesign rather than broad-scope rework. Studying user empathy methods and model-based iteration results provides evidence-grounded approaches for structuring redesign cycles.
Documentation is where most teams cut corners. Common areas missed in validation reporting include:
- Negative results: Scenarios that passed but only narrowly, indicating fragility.
- Deviation logs: Instances where participants deviated from the test script in revealing ways.
- Environmental conditions: The specific context in which testing occurred, which affects reproducibility.
- Iteration rationale: Why a specific design change was chosen over alternatives.
- Benchmark trend data: Score trajectories across multiple validation cycles, not just the latest result.
Without iteration, even the best validation is incomplete. A single validation cycle produces a snapshot; repeated cycles produce a trajectory that reveals whether the design is genuinely improving or oscillating around the same problems.
Pro Tip: Version your validation reports using a consistent naming convention tied to design release numbers. This practice enables rapid cross-referencing when post-launch issues require root-cause analysis.
What most teams overlook in design validation workflows
The prevailing focus in design validation centers on tool selection: which usability scale to use, which prototype fidelity to test, which moderation style to apply. These are legitimate concerns, but they represent the visible layer of a deeper practice. The highest-leverage phases, risk mapping and longitudinal tracking, receive the least systematic attention.
Teams that document failures rigorously, not just benchmark passes, accumulate institutional knowledge that prevents recurring defect patterns. Real-world teams applying FMEA and longitudinal benchmarking consistently report fewer post-launch failures because they treat validation as a continuous tracking system rather than a project milestone. The workflow impact of structured usability testing confirms this pattern across multiple study contexts.
Schedule periodic review sessions using the same risk map and scenario set from the original validation cycle. Comparing new findings against historical risk data reveals whether previously identified failure modes have been resolved or merely suppressed by design changes that introduced new fragility elsewhere.
Pro Tip: Treat your FMEA as a living document, updated at every major design milestone. Static risk assessments become obsolete as requirements evolve.
Advance your workflow with evidence-backed research
DesignDex aggregates peer-reviewed studies in UX and industrial design into structured, citation-ready insights that directly support the kind of evidence-based validation practice described in this guide.
For teams ready to operationalize their validation process, the platform provides distilled research on usability testing research, regulatory risk harmonization, and validation methodology across dozens of design domains. Instead of spending hours parsing full papers, you access structured breakdowns of aims, methods, findings, and real-world applications. Explore DesignDex resources to build a validation practice grounded in evidence rather than intuition, and stay current as the field evolves.
Frequently asked questions
What is the first step in a design validation workflow?
The first step is to clarify project goals and establish empirical benchmarks such as SUS, NASA-TLX, and PAI to ensure objective, measurable validation criteria are in place before any testing begins.
How do you handle edge cases in validation?
Map potential risks and extremes using FMEA, risk maps, and scenario exercises before testing; edge cases including behavior gaps, context gaps, accessibility failures, and input extremes are best identified and prioritized through risk-based analysis.
Which metrics matter most in design validation?
Task success rate, time-on-task, severity ratings, and PAI for aesthetics are the core empirical benchmarks; the appropriate combination depends on whether the validation target is a digital interface, a physical product, or a hybrid system.
How often should validation and verification be repeated?
Benchmark repeatedly at major design milestones and whenever features or requirements change; longitudinal data across multiple cycles provides far more actionable insight than any single validation event.
Recommended
- QFD integration can reduce work-related musculoskeletal disorders by proactively designing safer processes. — Design Research Summary | DesignDex
- Today's Design Digest | DesignDex
- Harmonizing Data Requirements Across EU Regulatory Agencies Streamlines Risk Assessment Processes — Design Research Summary | DesignDex
- Signals — Daily Design Intelligence | DesignDex